Wednesday, 20 March 2013

AMFPHP installation and solving config error

AmfPHP is to provide a really simple way of connecting a client with a server.

AmfPHP is a Remoting Library for PHP. Key features are support for AMF among other Protocols, and developer tools such as a service browser and a client code generator.

download and put it on the php site address location   /usr/local/apache2/htdocs/index.html
i followed up to 4 step - i get the result..


for details configuration steps follows 

for configuration:-

from http://www.gotoandlearnforum.com/viewtopic.php?f=17&t=20525&start=15


Hi everyone,

Hope this is the last reply for this post.Please follow the steps below for any problem installing AMFPHP 1.9 on your server. I am assuming u are using the version from this link http://sourceforge.net/projects/amfphp/files/amfphp/amfphp%201.9.zip/download

CheckList #1: Delete or comment out every line in the .htaccess file in amfphp folder.
CheckList #2: Check for the version of PHP of the server from this link http://yourserver/amfphp/phpinfo.php
CheckList #3: Most probably it is > 5.3. So u have to add this code on the first line of globals.php in ur amfphp root folder.

Code: Select all
 ini_set('date.timezone', 'America/Los_Angeles');

above this line
Code: Select all
list($usec, $sec) = explode(" ", microtime());

CheckList #4: If the above step does not work then search for the setting
Default timezone
from
Checklist #2.Refer to the image below for reference.
date.jpg
date.jpg (16.2 KiB) Viewed 3022 times

CheckList #5: Open up the file
Code: Select all
amfphp/core/shared/util/MethodTable.php
and jump to line 505. Once there, you need to replace these three lines:
Code: Select all
$comment = eregi_replace(”\n[ \t]+”, “\n”, trim($comment));
$comment = str_replace(”\n”, “\\n”, trim($comment));
$comment = eregi_replace(”[\t ]+”, ” “, trim($comment));

with these three lines below:
Code: Select all
$comment = preg_replace(”'\n[ \t]+'U”, “\n”, trim($comment));
$comment = str_replace(”\n”, “\\n”, trim($comment));
$comment = preg_replace(”'[\t ]+'U”, ” “, trim($comment));

Save and close the file.

Monday, 18 March 2013

version control system

version control system - svn

for easy installation go with
1. server - subversion edge by collabnet  
    client - tortoise svn

for notes: http://tortoisesvn.net/docs/release/TortoiseSVN_en/tsvn-preface.html#tsvn-preface-about

Thursday, 21 February 2013

Disable Automatic Updates Adobe Creative Suite CS4

Heres how to disable it from the CS4 iteration of their software offerings.
1. Go to HKEY_LOCAL_MACHINE\SOFTWARE\Adobe\
2. Set "AdobeOnlineDefault" to "0" (zero). If it doesnt exist, create it as a new String Value.
3. Go to HKEY_LOCAL_MACHINE\SOFTWARE\Adobe\CSXSPreferences\
4. Set "UpdatesAllowed" to "0" (zero). If it doesnt exist, create it as a new String Value.


 or


REG ADD "HKEY_LOCAL_MACHINE\SOFTWARE\Adobe" /f /v AdobeOnlineDefault /d "0"
and
REG ADD "HKEY_LOCAL_MACHINE\SOFTWARE\Adobe\CSXSPreferences" /f /v UpdatesAllowed /d "0"
 

Saturday, 5 January 2013

Creating bootable USB for win7

option 1:

Task 1: Making the USB drive an Active Primary Partition.

  1. Open a command prompt (with administrative rights if required by your OS).
  2. At the command Prompt type Diskpart and press enter
  3. Type List Disk and press enter
  4. You will see a list of all the disks on your computer.. A number will identify each disk.
    1. If you do not know which disk is you USB drive go through the list by typing Select Disk 1 enter and then type details. repeat until you know you are on the right USB drive. Hint: It is probably the last one.
  5. Type select disk 4* and press enter. The system will report: "Disk 4* is now selected" (*Where disk 4 is the number of the USB drive, change this number to reflect your system).
  6. Type Clean and press enter. The system will report "DiskPart succeeded in cleaning the disk." This will remove the disk from your current drive letter for your USB.
  7. Type create partition primary and press enter. The system will report "DiskPart succeeded in creating the specified partition."
  8. Type select partition 1 and press enter. The system will report "Partition 1 is now the selected partition."
  9. Type active and press enter. The system will report "DiskPart Marked the current partition as active."
  10. Type assign and press enter.  The system will report "DiskPart successfully assigned a drive letter ..."
  11. Type detail disk and press enter. Details will be listed and under the column heading "LTR" you will see the drive letter. I will assume it is U: for the remainder of the explanation.
  12. Type  exit  and press enter. This will leave the DiskPart context.

Task 2: Formating the USB Drive and copying the install files.

for cd mapping use magioiso -- magicdisk.
  1. If the command prompt is not still open, open the command prompt.
  2. Type format U: /fs:fat32 /q and press enter. (Where U: is the letter of your USB Drive)
  3. A warning will appear indicating all information on the drive will be lost. Type Y and press enter.
  4. You will be prompted to enter a label for the drive. Press enter to continue.
  5. We have now formatted the drive and can proceed to copying the files. Assuming Drive d: for DVD and Drive u: for USB
  6. Type xcopy d:\*.* /s/e/f u:\  . The files will copy and may take a long time depending on the USB drive performance.

 option 2:

use windows 7 usb dvd download tool

create  a bootable usb with the same bit version and os system..
otherwise it won't work...

Tuesday, 25 December 2012

torrent block and port redirection for site browsing

#torrent block


iptables  -A INPUT  -i $INSIDE  -d 0/0 -p tcp --dport 6881:7000 -j DROP
iptables  -A INPUT  -i $INSIDE  -d 0/0 -p tcp --dport 2710 -j DROP


port redirection for local site on internet.


# localcard

iptables -A FORWARD -p tcp -i eth0 -d 10.1.1.158 --dport  86 -j ACCEPT
iptables -A FORWARD -p tcp -i eth0 -d 10.1.1.158 --dport 9933 -j ACCEPT
iptables -A INPUT -i eth0 -d 0/0 -p tcp --dport 80 -j ACCEPT


# external card

iptables -t nat -A PREROUTING -p tcp -i eth1 -d 122.183.188.162 --dport 86 -j DNAT --to-destination 10.1.1.158:86

iptables -t nat -A PREROUTING -p tcp -i eth1 -d 122.183.188.162 --dport 9933 -j DNAT --to-destination 10.1.1.158:9933

Friday, 14 December 2012

apache with ssl


apache with ssl


for installation
http://www.modssl.org/example/

for SSL certificate
http://onlamp.com/onlamp/2008/03/04/step-by-step-configuring-ssl-under-apache.html
http://www.apache.com/resources/how-to-setup-an-ssl-certificate-on-apache/


how to start apache without manually entering the ssl passphrase


location

/usr/local/apache2/conf/extra

create file - with execution permission
passphrasepassword


passphrasepassword file content
----------------
#!/bin/sh
echo "Im98Redh@7"


httpd-ssl.conf

edit:
SSLPassPhraseDialog  exec:/usr/local/apache2/conf/extra/passphrasepassword


Sunday, 9 December 2012

maya on linux

maya 2009 on fedora 8


Notes:

  
install NVIDIA-Linux-x86_64-310.19.run ( download latest from nvida site)

yum install tcsh

yum install libXp 
 
install maya. 
 
for crack:
---------
use windows cracking method  to create aw.dat

license location /var/flexlm
copy the generated aw.dat into this directory (use windows pc to create aw.dat)
 

for shortcut problems
-------------------- 
GNOME - system - preferences  - look and feel - windows - moment key - select super 
 
KDE - control center - desktop - windows behavior - windows actions - inner windows
- change to nothing 
 
 
maya settings : Window>Settings/Preferences>Hotkeys. 

ref:


maya requir
-----------
http://www.dl4all.com/software/1351950-autodesk-maya-85-windows-linux-and-mac-os-x.html
http://usa.autodesk.com/adsk/servlet/ps/dl/item?siteID=123112&id=15458252&linkID=9242258#section12

Ubuntu
------
http://baltazaar.wordpress.com/2009/03/19/installing-maya-2009-64-bit-on-linux/
http://ubuntuforums.org/archive/index.php/t-1030249.html

**shell script : https://gist.github.com/3250500
nvida
-------
http://www.if-not-true-then-false.com/2009/howto-install-nvidia-driver-on-fedora-and-just-disable-the-nouveau-driver/

 
#lspci | grep -i VGA

#rpm -Uvh http://rpm.livna.org/livna-release.rpm
#yum -y install kmod-nvidia glx-utils

Wednesday, 5 December 2012

3dsmax, combustion, maya - supporting packages

3DSMAX9


  • Max 9
  • DWF viewer 7
  • Backburner
  • FBX plugin 2006.08
  • .Net framework 2.0


3DSMAX 2009

   
  • MS Visual c++ 2005 Redistributable
  • .Net Framework Runtime 2.0 sp1
  • .Net Framework Runtime 3.0
  • DirectX Runtime update
  • Msxml 6.0 parser
  • Backburner 2008.1
  • FBX plugin 2009.0 for max 2009


3DSMAX 2010


  • MS Visual c++ 2005 Redistributable
  • MS Visual c++ 2008 Redistributable - x86 9.0.30729.17
  • .Net Framework Runtime 3.5 sp1
  • DirectX Runtime update
  • Msxml 6.0 parser
  • Backburner 2008.1
  • FBX plugin 2009.4
  • .Net Framework Runtime 2.0 sp2
  • .Net Framework Runtime 3.0 sp2
  • Ms National language support Downlevel APIs
  • Max 2010
  • Max 2010 Components
  • Max 2010 Tutorials


MAYA 8.5


  • Maya 8.5
  • Direct connect 2.0
  • Maya 8.5 Documentation
  • Sentinel System Driver


MAYA 2009


  • Maya 2009
  • Maya 2009 Documentation
  • Direct connect 2009


Maya 2011


  • MS Visual c++ 2005 Redistributable
  • MS Visual c++ 2008 sp1 Redistributable
  • DirectX Runtime update
  • Maya 2011
  • Maya 2011 English documentation
  • MatchMover 2011
  • Composite 2011
  • Backburner 2011.0.0
  • DirectConnect 2010 R1


Maya 2012


  • Maya 2012
  • MatchMover 2012
  • Composite 2012
  • Backburner 2012
  • DirectConnect 2012
  • .Net Framework 2.0 sp2
  • MS Visual c++ 2005 Redistributable
  • MS Visual c++ 2008 Redistributable x86 9.0.30729.4148
  • Physx Plug-in


Combustion-4


  • Combustion 4
  • Backburner 2.3


Combustion-2008


  • Combustion 2008
  • Backburner 2008.0.0
  • VC8MSI

uninstall 3ds max

1.Uninstall peripheral applications

  • FBX add-in
  • any other related add-ins and then uninstall the main application

    max 
    Backburner
    Backburner 2008.1
    Backburner 2008.1
    DWF viewer 7
    FBX plugin 2006.08
    FBX plugin 2009.0 for max 2009
    FBX plugin 2009.4
    Msxml 6.0 parser

    combustion 
    Backburner 2.3
    Backburner 2008.0.0
    VC8MSI

2.Uninstall Autodesk products

3.Delete remaining Autodesk product files and folders

  • C:\Program Files\AutoCAD 2010" or "C:\Program Files\Autodesk\AutoCAD 2012".
  • Delete the folder, "C:\Program Files\Common Files\Autodesk Shared"

 Windows 7/Windows Vista

  • C:\Users\%username%\AppData\Roaming\Autodesk
  • C:\Users\%username%\AppData\Local\Autodesk
  • C:\ProgramData\Autodesk
Windows XP
  • C:\Documents and Settings\%username%\ Application Data\Autodesk
  • C:\Documents and Settings\%username%\Local Settings\Application Data\Autodesk
  • C:\Documents and Settings\All Users\Application Data\Autodesk


4.Delete remaining Autodesk product entries from the Windows registry

- HKEY_CURRENT_USER\Software\Autodesk
- HKEY_LOCAL_MACHINE\Software\Autodesk

note: before deletion check with other autodesk products


Tuesday, 4 December 2012

mail configuration of godaddy.com $ imediajobs.in

for imediajobs.in mail configuration


use this setup

pop.asia.secureserver.net  ssl 995
smtpout.asia.secureserver.net ssl 465

donot use this  smtpout.secureserver.net


site add : email.imediajobs.in

Wednesday, 24 October 2012

Bug Checks (Blue Screens)

http://msdn.microsoft.com/en-us/library/hh994433%28v=vs.85%29.aspx


Wednesday, 3 October 2012

ipad update procedure

update ipad with ipsw files

How to Use IPSW files

You can use IPSW files on Mac or Windows, both require iTunes.
  • Connect your iPhone or iOS device to your computer
  • Select the device in iTunes
  • On a Mac, hold down the “Option” key and then click on “Update”
  • On a Windows PC, hold down “SHIFT” key and then click on “Update”
  • Select the IPSW file you downloaded and click “Choose”
  • Let the iOS device update as usual
You can also click on “Restore” and select an IPSW instead but you will lose the existing files and settings on your iOS device.

ref : http://osxdaily.com/2010/11/23/how-to-use-ipsw-files/
        http://osxdaily.com/2012/09/19/ios-6-ipsw-direct-download-links/

Monday, 24 September 2012

msconfig : An Access Denied error was returned while attempting to change a service access. You may need to log on using an Administrator account

I've attempted to make changes to the startup programs using MSCONFIG and got:


"An Access Denied error was returned while attempting to change a service access. You may need to log on using an Administrator account to make the specified changes"

first i thing it is a virus. a tried with many antivirus. but no use.
then i uninstalled  the McAfee antivirus. problem solved. finally i conclude it is a McAfee setting problem. even though i am using standard production it's give the error log.

so don't worry abt this error. change ur antivirus or neglect this dialog box.


Fixing A Broken Wacom pen


i tried with this link it's working..

http://abiyasa.com/blog/2009/05/04/fixing-a-broken-wacom-soldering/


On my previous post (fixing a broken wacom pen), I accidentally glued the pen tip to the iron core. The glue was a mess; the iron core, the plastic part, and the pen tip, all sticked together :-(
This causing the Wacom tablet couldn’t detect any pen pressure although the pen tip position is detected. The pen tip is not moveable, that’s why.
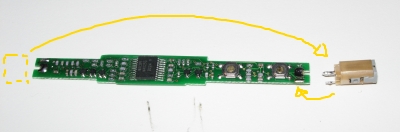
Since the eraser part was still working and I rarely use it, I decided to desolder the and move the eraser part to the pen tip.
my soldering plan
my plan
Preparation
I bought a cheap solder iron (around 3 EUR), 10cm tin solder wire (less than 1 EUR, no need to buy one big roll), and if necessary, a solder sucker. I didn’t bought this last item.
If you haven’t done any soldering before, just ask your friend or someone to do it ;-)
Soldering Time
The idea is to desolder both pen’s coil wires and the eraser’s one, and exchange them (see my plan above).
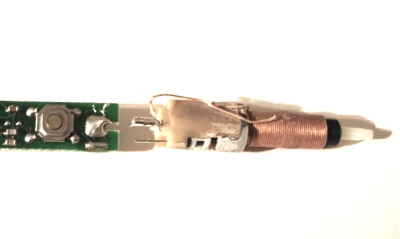
First, I open the wacom pen. It’s easy since I have it opened before. Then desolder the pen tip part.
There are two parts you have to desolder: the part which connects the wires from the coil, and the other part which stick the plastic part to the PCB/component board. Once you desolder these parts, the pen component can be easily removed.
desolderpentip
Now, desolder the eraser part. You can desolder first the coil’s wire so you can unplug the coil.
desoldereraser1
Then desolder the plastic component part and re-solder it back to the pen tip area.
solderback
done
Done! I could throw away the pen tip component but I decided to soldered it back to the eraser part. I put the pen cover back and tested it.
It works! Now I have a ‘new’ pen tip :-)

http://abiyasa.com/blog/2009/05/04/fixing-a-broken-wacom-soldering/

Thursday, 13 September 2012

unity offline installation

When you launch Unity, it asks you to choose manual or internet activation. Choose the manual activation and then there are two buttons. One says "Save License Request" which will allow you to save the files you need to choose on https://store.unity3d.com/manual. After saving it, you just find the file that you downloaded from the Unity website and select it with the "Read License" button.

 links.

Harddisk usage/space problem with Premiere Pro

check ur c drive location 

C:\Users\<username>\AppData\Roaming\Adobe\Common\Media Cache Files\

it has  cached files of a project.

Monday, 6 August 2012

CRONTAB

shutdown ur pc

 at 11pm


add this line using          

crontab -e

0  23  *  *  *   /sbin/init 0 


squid log file backup

at 1 am
00 01  * * *  /usr/local/squid/sbin/squid -k rotate


squid conf file reconfigure

at 7.30 pm 

30 19 * * * root /bin/cp -f /home/support/squid-rnd-n.conf /usr/local/squid /etc/squid.conf; /usr/local/squid/sbin/squid -k reconfigure

Configure LDAP Server in order to share users accounts in your local networks.


i have tested with cent6.0 it's working fine. 
 
ref site : http://www.server-world.info/en/note?os=CentOS_6&p=ldap&f=1

in my criteria system name is m1.iminds.com
change "dc=***,dc=***"  to dc=iminds,dc=com


in frontend.ldif    change "dc: server"  to dc: iminds

for add ldap user : 
 sh ldapuser.sh
 ldapadd ......

for add ldap group : 
 sh ldapgroup.sh
 ldapadd ...... 
 
 
some useful ref sites:
 
http://www.linuxhomenetworking.com/wiki/index.php/Quick_HOWTO_:_Ch31_:_Centralized_Logins_Using_LDAP_and_RADIUS

http://vuksan.com/linux/LDAP_authentication_under_Linux.html 

MASQUERADE

eth0 - local private network
eth1 - public network 
 
 
iptables -t nat -A POSTROUTING -s 10.1.1.0/24 -o eth1 -j MASQUERADE
 
 
check ur dns server having proper internet..  

Wednesday, 1 August 2012

Squid delay pool


./configure --prefix=/opt/squid --exec-prefix=/opt/squid --enable-delay-pools --enable-cache-digests --enable-poll --disable-ident-lookups --enable-truncat --enable-removal-policies

http://kasimbu.blogspot.com/2009/03/manajemen-bandwidth-di-squid.html
http://it.toolbox.com/wiki/index.php/Install_Squid_with_delay_pools
http://man.chinaunix.net/newsoft/squid/Squid_FAQ/FAQ-19.html

600000
250000/600000 5000/


768 kbytes overall acl
256kbytes for acl
download 2kbps
96000/96000 32000/32000 250/250

delay_pools 4
delay_class 1 2
delay_class 2 2
delay_class 2 3
delay_class 2 4
delay_access 1 allow acl_name
delay_parameters 1 32000/32000 640/640  or 640/32000