Wednesday, 5 December 2012

3dsmax, combustion, maya - supporting packages

3DSMAX9


  • Max 9
  • DWF viewer 7
  • Backburner
  • FBX plugin 2006.08
  • .Net framework 2.0


3DSMAX 2009

   
  • MS Visual c++ 2005 Redistributable
  • .Net Framework Runtime 2.0 sp1
  • .Net Framework Runtime 3.0
  • DirectX Runtime update
  • Msxml 6.0 parser
  • Backburner 2008.1
  • FBX plugin 2009.0 for max 2009


3DSMAX 2010


  • MS Visual c++ 2005 Redistributable
  • MS Visual c++ 2008 Redistributable - x86 9.0.30729.17
  • .Net Framework Runtime 3.5 sp1
  • DirectX Runtime update
  • Msxml 6.0 parser
  • Backburner 2008.1
  • FBX plugin 2009.4
  • .Net Framework Runtime 2.0 sp2
  • .Net Framework Runtime 3.0 sp2
  • Ms National language support Downlevel APIs
  • Max 2010
  • Max 2010 Components
  • Max 2010 Tutorials


MAYA 8.5


  • Maya 8.5
  • Direct connect 2.0
  • Maya 8.5 Documentation
  • Sentinel System Driver


MAYA 2009


  • Maya 2009
  • Maya 2009 Documentation
  • Direct connect 2009


Maya 2011


  • MS Visual c++ 2005 Redistributable
  • MS Visual c++ 2008 sp1 Redistributable
  • DirectX Runtime update
  • Maya 2011
  • Maya 2011 English documentation
  • MatchMover 2011
  • Composite 2011
  • Backburner 2011.0.0
  • DirectConnect 2010 R1


Maya 2012


  • Maya 2012
  • MatchMover 2012
  • Composite 2012
  • Backburner 2012
  • DirectConnect 2012
  • .Net Framework 2.0 sp2
  • MS Visual c++ 2005 Redistributable
  • MS Visual c++ 2008 Redistributable x86 9.0.30729.4148
  • Physx Plug-in


Combustion-4


  • Combustion 4
  • Backburner 2.3


Combustion-2008


  • Combustion 2008
  • Backburner 2008.0.0
  • VC8MSI

uninstall 3ds max

1.Uninstall peripheral applications

  • FBX add-in
  • any other related add-ins and then uninstall the main application

    max 
    Backburner
    Backburner 2008.1
    Backburner 2008.1
    DWF viewer 7
    FBX plugin 2006.08
    FBX plugin 2009.0 for max 2009
    FBX plugin 2009.4
    Msxml 6.0 parser

    combustion 
    Backburner 2.3
    Backburner 2008.0.0
    VC8MSI

2.Uninstall Autodesk products

3.Delete remaining Autodesk product files and folders

  • C:\Program Files\AutoCAD 2010" or "C:\Program Files\Autodesk\AutoCAD 2012".
  • Delete the folder, "C:\Program Files\Common Files\Autodesk Shared"

 Windows 7/Windows Vista

  • C:\Users\%username%\AppData\Roaming\Autodesk
  • C:\Users\%username%\AppData\Local\Autodesk
  • C:\ProgramData\Autodesk
Windows XP
  • C:\Documents and Settings\%username%\ Application Data\Autodesk
  • C:\Documents and Settings\%username%\Local Settings\Application Data\Autodesk
  • C:\Documents and Settings\All Users\Application Data\Autodesk


4.Delete remaining Autodesk product entries from the Windows registry

- HKEY_CURRENT_USER\Software\Autodesk
- HKEY_LOCAL_MACHINE\Software\Autodesk

note: before deletion check with other autodesk products


Tuesday, 4 December 2012

mail configuration of godaddy.com $ imediajobs.in

for imediajobs.in mail configuration


use this setup

pop.asia.secureserver.net  ssl 995
smtpout.asia.secureserver.net ssl 465

donot use this  smtpout.secureserver.net


site add : email.imediajobs.in

Wednesday, 24 October 2012

Bug Checks (Blue Screens)

http://msdn.microsoft.com/en-us/library/hh994433%28v=vs.85%29.aspx


Wednesday, 3 October 2012

ipad update procedure

update ipad with ipsw files

How to Use IPSW files

You can use IPSW files on Mac or Windows, both require iTunes.
  • Connect your iPhone or iOS device to your computer
  • Select the device in iTunes
  • On a Mac, hold down the “Option” key and then click on “Update”
  • On a Windows PC, hold down “SHIFT” key and then click on “Update”
  • Select the IPSW file you downloaded and click “Choose”
  • Let the iOS device update as usual
You can also click on “Restore” and select an IPSW instead but you will lose the existing files and settings on your iOS device.

ref : http://osxdaily.com/2010/11/23/how-to-use-ipsw-files/
        http://osxdaily.com/2012/09/19/ios-6-ipsw-direct-download-links/

Monday, 24 September 2012

msconfig : An Access Denied error was returned while attempting to change a service access. You may need to log on using an Administrator account

I've attempted to make changes to the startup programs using MSCONFIG and got:


"An Access Denied error was returned while attempting to change a service access. You may need to log on using an Administrator account to make the specified changes"

first i thing it is a virus. a tried with many antivirus. but no use.
then i uninstalled  the McAfee antivirus. problem solved. finally i conclude it is a McAfee setting problem. even though i am using standard production it's give the error log.

so don't worry abt this error. change ur antivirus or neglect this dialog box.


Fixing A Broken Wacom pen


i tried with this link it's working..

http://abiyasa.com/blog/2009/05/04/fixing-a-broken-wacom-soldering/


On my previous post (fixing a broken wacom pen), I accidentally glued the pen tip to the iron core. The glue was a mess; the iron core, the plastic part, and the pen tip, all sticked together :-(
This causing the Wacom tablet couldn’t detect any pen pressure although the pen tip position is detected. The pen tip is not moveable, that’s why.
Since the eraser part was still working and I rarely use it, I decided to desolder the and move the eraser part to the pen tip.
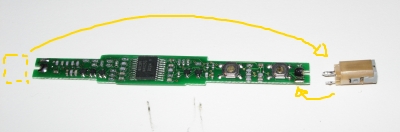
my soldering plan
my plan
Preparation
I bought a cheap solder iron (around 3 EUR), 10cm tin solder wire (less than 1 EUR, no need to buy one big roll), and if necessary, a solder sucker. I didn’t bought this last item.
If you haven’t done any soldering before, just ask your friend or someone to do it ;-)
Soldering Time
The idea is to desolder both pen’s coil wires and the eraser’s one, and exchange them (see my plan above).
First, I open the wacom pen. It’s easy since I have it opened before. Then desolder the pen tip part.
There are two parts you have to desolder: the part which connects the wires from the coil, and the other part which stick the plastic part to the PCB/component board. Once you desolder these parts, the pen component can be easily removed.
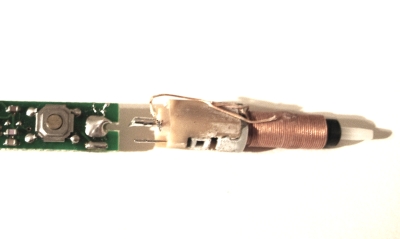
desolderpentip
Now, desolder the eraser part. You can desolder first the coil’s wire so you can unplug the coil.
desoldereraser1
Then desolder the plastic component part and re-solder it back to the pen tip area.
solderback
done
Done! I could throw away the pen tip component but I decided to soldered it back to the eraser part. I put the pen cover back and tested it.
It works! Now I have a ‘new’ pen tip :-)

http://abiyasa.com/blog/2009/05/04/fixing-a-broken-wacom-soldering/